Friday, May 13, 2011

Recovering your “mosaic” password

The following topic applies to customers with Mosaic installed on your own servers

To recover access via “mosaic” you need to modify the vci.config.xml file (in the “config” folder) for the relevant Mosaic web.

Locate the "Vci.Mosaic.Authentication.Mode" key and make a note of the current value.

Then change the value to “Maintenance” as shown:

<add key="Vci.Mosaic.Authentication.Mode" value="Maintenance" />

You can now login from a browser on the server itself as “mosaic” with no password. You must be on the web server to do this.

Once logged in, change the “mosaic” password via the options link (upper right). You can also go to Administration | Security -> Personnel and right-click on the row for the “mosaic” user to set the password.

When you are done, restore your vci.config.xml to its original state.

Thursday, May 12, 2011

Updating Mosaic

For customers with Mosaic installed on your own servers, there are four components of installing an update.

  1. Update the Mosaic Database
  2. Update the Mosaic Web
  3. Update the Mosaic Metadata
  4. Update the MosaicService

Step 1:  Update Mosaic Database

Step (1) is not always needed, but if it is, then we’ll tell you.

ORACLE Users

You will receive a file named similar to Update-YYYY-MMDD.zip which you’ll extract to a temporary location.  Then run Update.bat:

c:\temp> UPDATE MOSAIC/MOSAICPW@ORCL

Microsoft SQL Server Users

You will receive a file named similar to UpdateMsSql-YYYY-MMDD.zip which you’ll extract to a temporary location.  Then run Update.bat with the following usage:

UPDATE SCHEMA_NAME SCHEMA_USER PASSWORD SQLSERVER

The SCHEMA_NAME is always MOSAIC.  SCHEMA_USER and PASSWORD may vary according to your installation.

Example:
c:\temp> UPDATE MOSAIC MOSAIC MOSAIC MSDB

Step 2:  Update Mosaic Web

You will receive a file named similar to Mosaic-YYYY-MMDD.zip.  Simply extract the contents to a new directory and “point” your Mosaic IIS web application to this new directory.  Use the “Basic Setttings…” dialog in the IIS Manager.

Notes:

If you have custom authentication DLLs, copy them from your old “bin” directory to your new one.

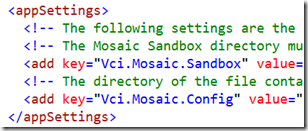
If you have custom locations for your configurations and sandbox directories, copy the following block from your old web.config to the corresponding section of your new web.config
image

Step 3:  Update Mosaic Metadata

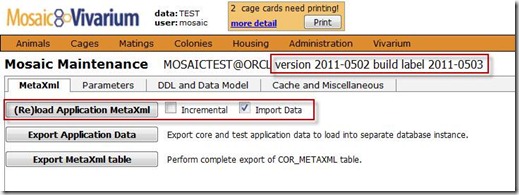
Login as the “mosaic” user.  Visit Administration | Maintenance –> Mosaic Maintenance.  Press the “(Re)load Application MetaXml” button with “Incremental” unchecked, and “Import Data” checked.
clip_image002

After this finishes, restart the web application using the IIS Manager.  Each Mosaic web application (test, production) should have its own application pool. Restart the appropriate application pool.

Step 4:  Update MosaicService

You will receive a file named similar to MosaicService-YYYY-MMDD.zip.  If this is your first installation of MosaicService, follow the instructions in “Install MosaicService.docx” which will be provided.

For updates to an existing MosaicService installation, follow these steps:

  1. Rename your existing vci.config.xml file to vci.config.original to save your existing settings.
  2. Stop the Mosaic Service.
  3. Extract the provided .zip file containing new binaries over the existing binaries.
  4. Edit the new vci.config.xml and bring back any customizations you have made from vci.config.original (usually SMTP settings).
  5. Start the Mosaic Service.
  6. Check the Application Event Log.

After these steps, you’ll need to restart your Mosaic web application as described in Step 3.

Monday, May 9, 2011

* ? X

What are those symbols on my breeding cage cards?

image

Have you printed any new breeding cards yet? These cards always show the parents associated with the original mating configuration. However, those parents may not always be in the cage.  For example, you may have moved one female to her own cage, and euthanized the male. To make this more clear, you will see a small column with a symbol on the left of the card where the parents are listed:

* means this parent is currently in this cage.
? means this parent has been moved to some other cage.
X means this parent is not alive.

Wednesday, May 4, 2011

New Receiving Cage Cards

We have three new cage card templates streamlined for receiving. Take a look at the examples below, and if any of them fit your needs, their names are "Receiving 1", "Receiving 2", and "Receiving 3" in Mosaic. Just choose them when creating your receiving cage cards.

These are optimized for the DYMO 30256 stock, landscape orientation.

We can also have investigator phone numbers on cage cards. If you want a customized cage card including phone numbers, different printer stock, different orientation, contact us through the Mosaic feedback link on your account.

Receiving 1


Receiving 2


Receiving 3

Tuesday, January 18, 2011

Browser Caches

Sometimes, after a Mosaic web site update, a page may not work properly or may even indicate an error. This is most often due to cached Javascript.  This can also affect the Cage Side Assistant.
The first thing to try is simple:  hold your Shift key and press the browser’s refresh button:

image

If that does not work, the following is known to work for IE and Chrome:
put your cursor in the URL address area and then press CNTL-F5.

If that does not work, follow these steps:

  1. Close all browser windows
  2. Open browser and login to Mosaic
  3. Press the “logout” link
  4. Close all browser windows (again)
  5. Open browser and login to Mosaic

If none of the steps above worked or if you are interested in learning more about web browser caching, take a look at this excellent website:

Wednesday, January 12, 2011

Print Dialogs for Adobe Reader and DYMO Turbo 450

Printing Mosaic Vivarium cage card labels on the DYMO Turbo 450 requires specific settings to prevent unwanted clipping of the edges. All Vivarium templates (whether "landscape" or "portrait") are setup to print with Adobe Reader 9.3 or 9.4 print dialog in the standard "Portrait" mode with the following settings.

In particular, note:

Page Scaling is set to Fit to Printable Area.
Auto-Rotate and Center is checked.

If you press the "Properties" button, you'll see the second image where "Orientation" is set to "Portrait."
For more details on this topic, in Mosaic Vivarium on the Cage Cards worksheet, click the "Correct DYMO Printer Settings" link:


Thursday, July 1, 2010

Connecting the Zebra/Motorola Symbol 4278 Bluetooth Scanner to a Laptop

The LS 4278 is a great option for cord-free barcode scanning.

Update 2019:  The LS 4278 has been superseded by the  LI 4278 which solves some difficulties with direct Bluetooth connections to computers and tablets.  Also, check below for special notes on pairing the LI 4278 with an iPad.

For easiest connectivity, we recommend you purchase a kit containing a cradle which connects via USB to the computer. The scanner then communicates via Bluetooth to the cradle which sits next to the computer and relays the data through USB.  This requires no direct Bluetooth connection to the computer.

An example: Amazon LI 4278

However, you can also purchase a charging-only cradle (with power supply) which does not have the USB connection. In this scenario, you need to Bluetooth-pair the scanner directly with the computer. We have found that his works nicely, but there are some tricks to getting the scanner to reliably pair with the computer.

To pair the scanner directly with the computer, scan the following barcodes from the Symbol 4278 Quick Reference Guide in order:
Page 6 SET DEFAULTS
Page 13 BLUETOOTH KEYBOARD EMULATION (HID SLAVE)
Page 14 SCAN OPTIONS
<DATA>SUFFIX>
ENTER
Now set your computer to discover devices. The scanner, identified by its serial number, should appear. Wait for the serial number to appear.  Attempt to pair with the device. If a PIN is requested, type 12345.

In most cases, this will work. However, if it does not, then right-click on the discovered scanner icon in the bluetooth devices, choose Properties, click on the services tab, and check the box that enables HID drivers. Your scanner should now pair.
image

Pairing with an iPad
For the LI4278 there is a newer firmware and pairing procedure that allows you to have a double-click command with the scanner trigger that will bring up the iPad on screen keyboard. Zebra provides detailed instructions here:

Zebra Support - Link LI 4278 to iPad

NOTE: pairing the older LS 4278 with an iPad will interfere with your ability to obtain the on-screen keyboard.
